

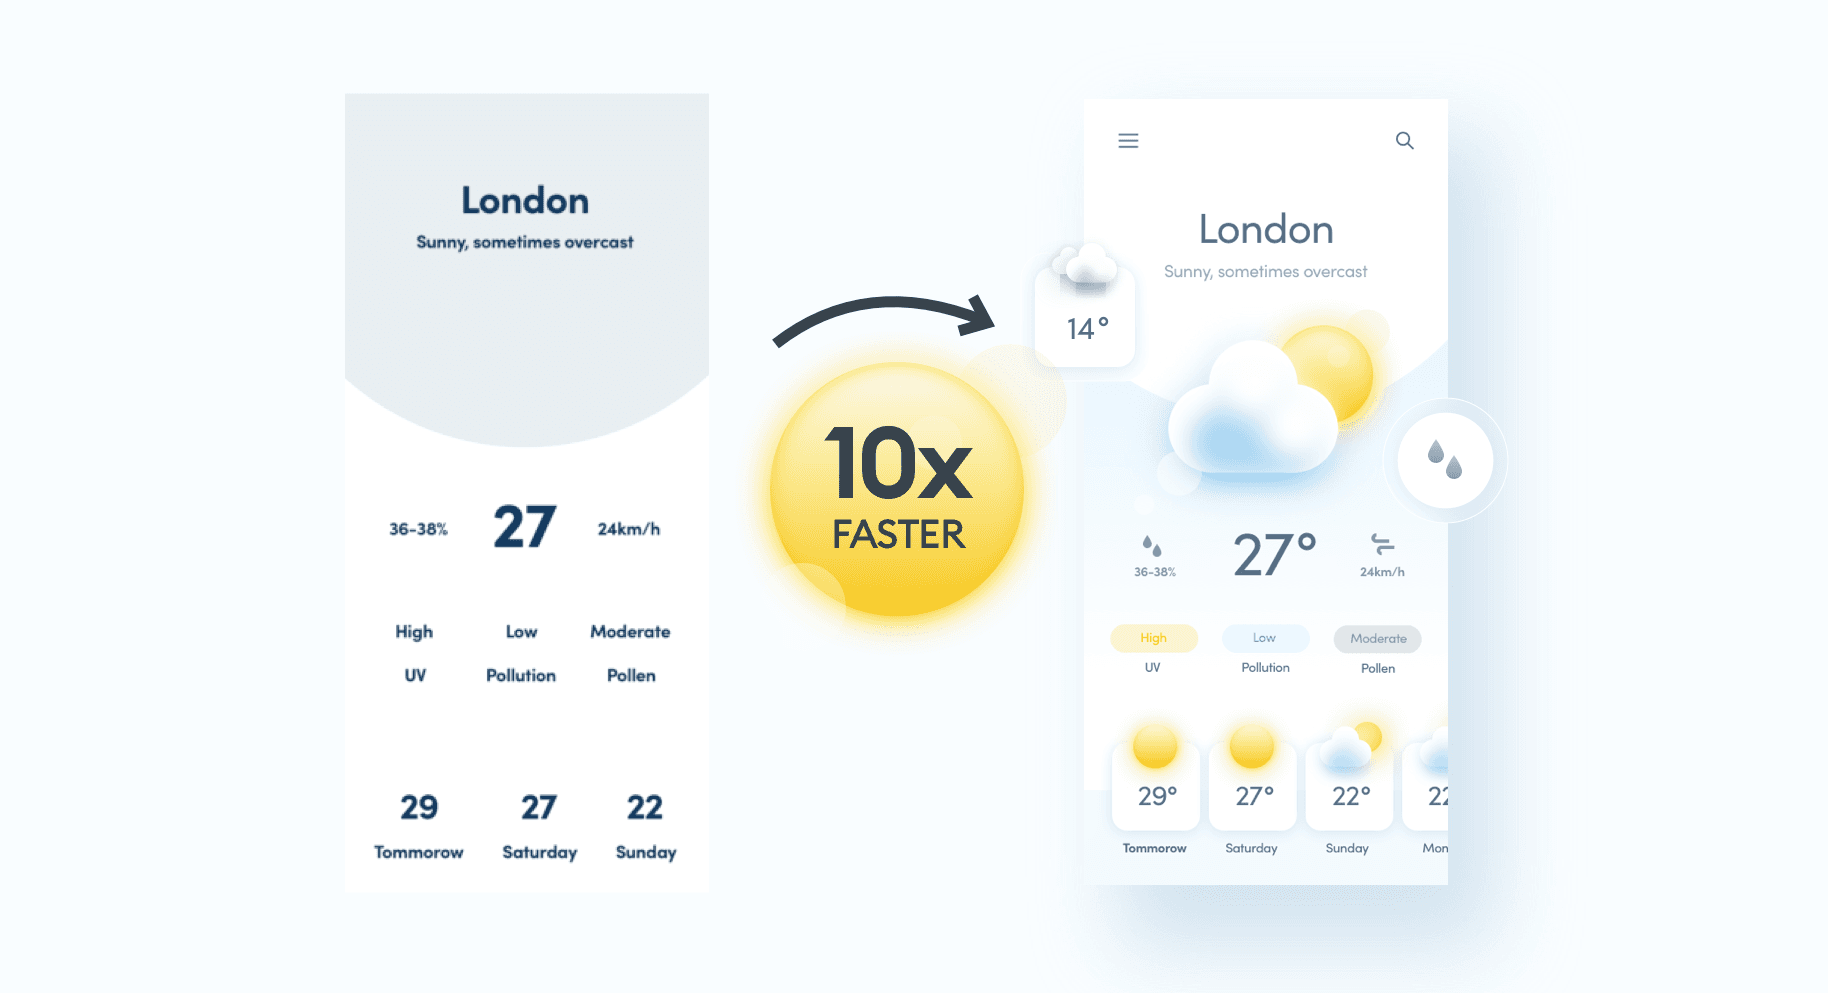
The design world is getting faster and faster every year. Why? There are a couple of reasons. One is that the recent design tool revolution made our workflows much easier and faster. The last few years were also the adventof design systems, or even design libraries and components. We also have a lot of existing knowledge of what works well, so in many cases, we can use these safe patterns to come up with design solutions much faster.

In general, design is about finding solutions to problems.
There’s another, less poetic reason too — with the global economy declining, companies simply cannot afford as much “design-time” as they were before. They still expect similar results though.
I’m going to share two basic techniques that can help you design faster. Of course, there’s a lot more to speed design in problem-spotting, problem-clearing, and fixing the obvious to reveal hidden issues. But let's start with something easy.
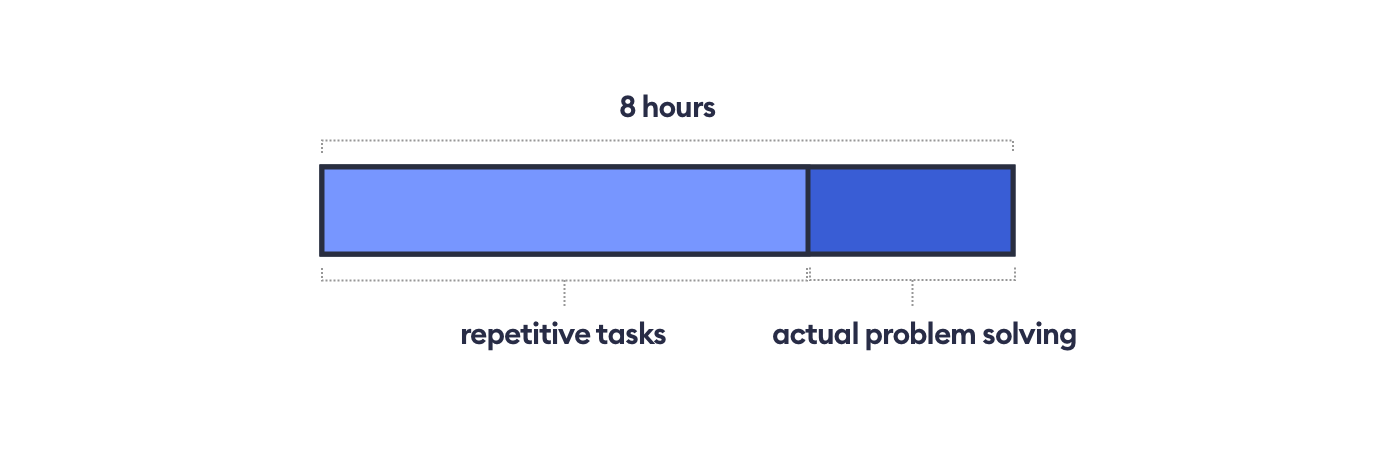
During a typical, 8-hour day, the actual “design” and problem solving usually takes only a small portion of the time. Most of it is repetitive tasks that we can optimize.
Why speed design?
Now here’s the thing. The above reasons for speed design are all good, but they’re all business-based. And I’d like to think from the designer=human perspective too.
Counting hours as a way to calculate income is becoming an antiquated way, and when working from home, we should definitely push a “per outcome” approach. Estimate a cost for your work. Then do the work. Don’t worry about the “hours”.

You can accomplish the same amount of work done in less time. Which one would you choose?
And if you estimate it well and use the speed design techniques you, as a designer, will have a lot more time for other things. You’ll finish your UI design a lot faster. You can use that time to either learn new skills or simply relax.
The fact that the world is fast, doesn’t mean you need to keep running the hamster wheel all day. Just be fast and hyper-focused for short bursts. Finish your work and then it’s your time, on your terms.
Compounding effect
Now listen up gang! We’re going to be saving seconds here. Yes — seconds.
When this approach becomes second nature, these seconds will compound into hours, days, and weeks. Because if you save a second or two on every little part of the job, the sum of the time saved is going to be a lot greater.
And if one technique saves you 8 seconds every hour, then this one technique will save you four full hours in a year of work. If you combine many of the techniques and a proper mindset you’ll be saving an hour a day in no-time.
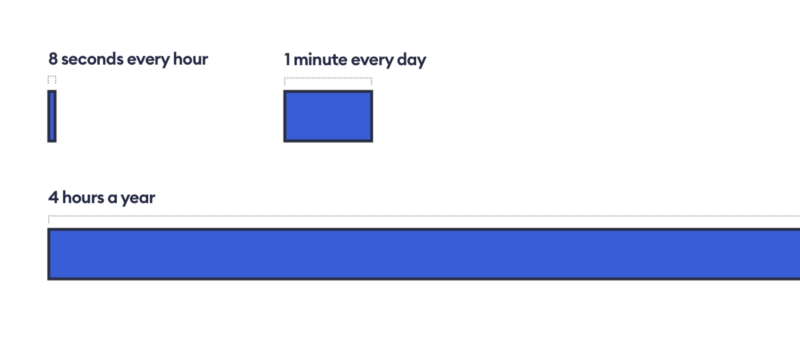
And yes, at this scale 4 hours wouldn’t even fit on the canvas :-)
Master the Nudge, Push & Shove
Let’s start with the basics. If you’re still moving all the UI rectangles to their final position with your mouse cursor, then you should stop right now! There are two more efficient ways to move an object to the right position.
One of them, if you’re grid-obsessed is to simply enter the right number for the X and Y values in the inspector. But let’s be honest — most of us don’t do that. We move things with our mouse to an approximate position, and then we nudge.
Nudge
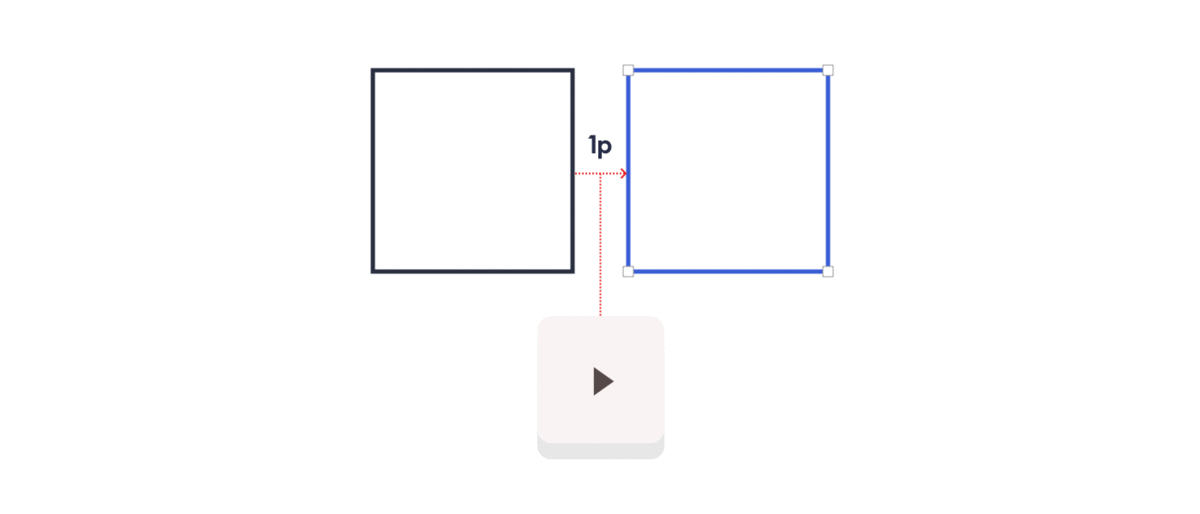
You do it by selecting and object and pressing an arrow key on the keyboard. In the example above the blue square is nudged by one point by a single press of the right arrow key. Of course the more you press your arrow key, the more you will move the object. But what if you want to nudge something by 10 points? Pressing the right arrow key 10 times would be a huge waste of time, right?
Push
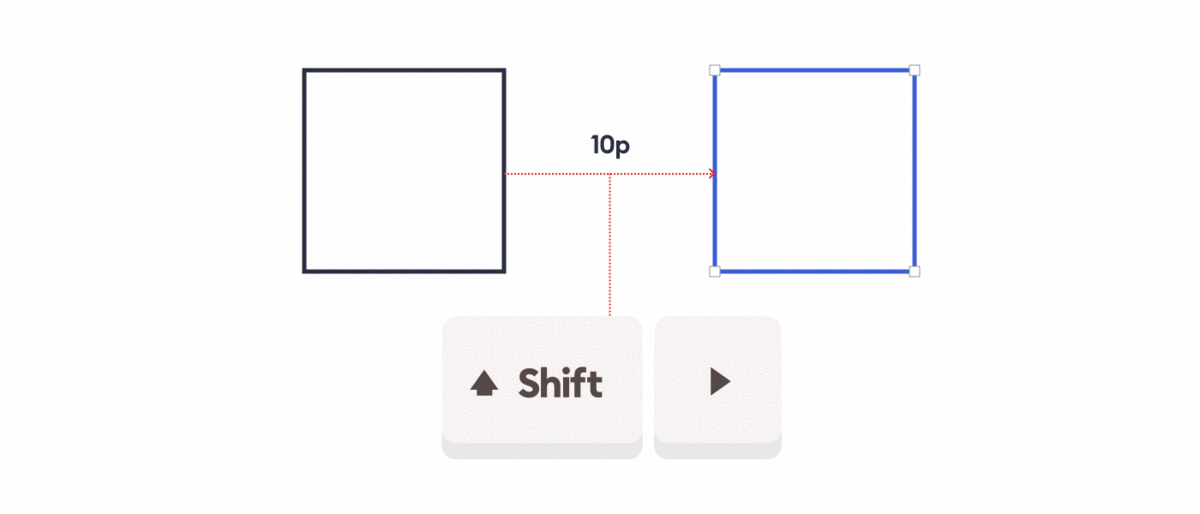
Push is a combination of SHIFT and an arrow key, that allows you to move objects even further — 10 points by default.
Now, I know this is super basic but hang in there. Just one more and I’ll show you something really cool.
Shove
Some plugins allow you to go oven further. A Sketch plugin called Nudge, Push, Shove adds one more option called shove. It also allows you to modify the value for all three moves.
Now when you press ALT + SHIFT + the arrow, you’re going to shove the element by 15 points by default.
These three keyboard-based moving techniques are essential for a speedy workflow. But it’s likely you already know that, so here’s the fun part.
Here comes the magic!
You can combine nudge, push, and shove to decrease the number of keystrokes necessary to accomplish the same thing.
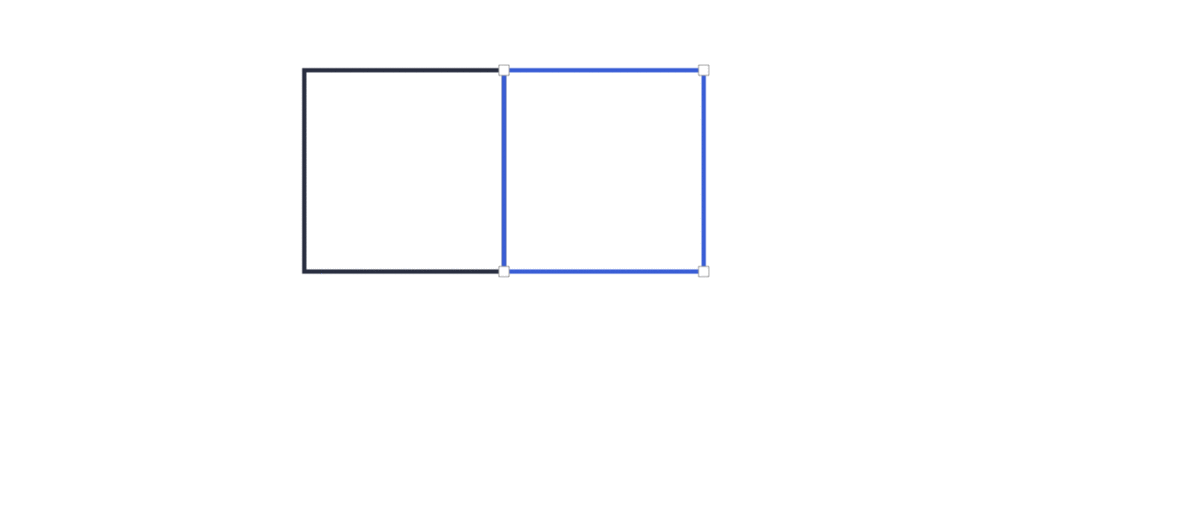
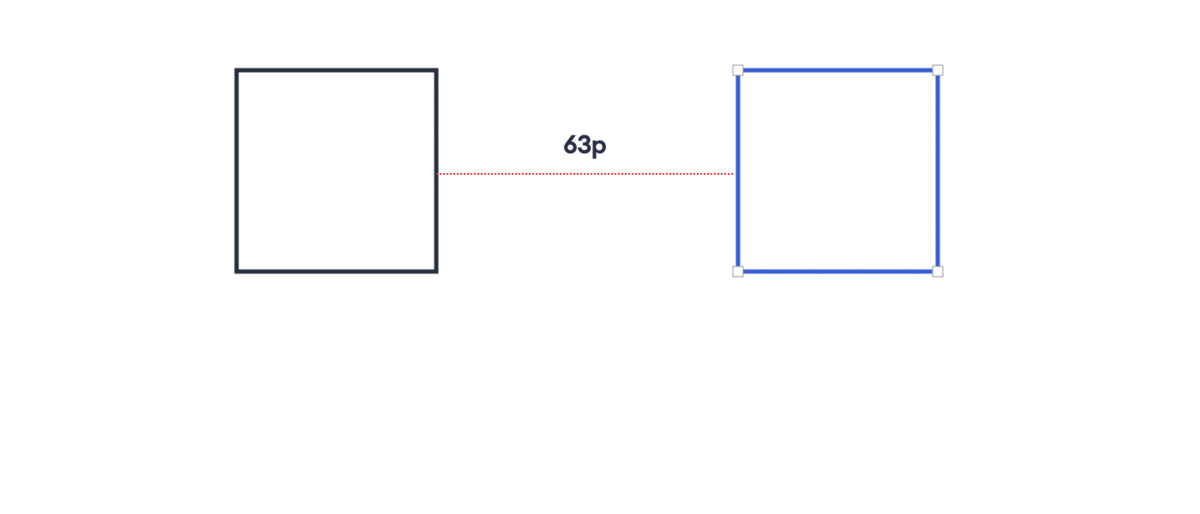
Let’s look at this particular scenario — we have two rectangles, currently 63points apart. We want to nudge them to be 55 points apart.
63–55=8.
What would you do? There are two main ways to accomplish this.

The “obvious”, longer way that most of my students (during the first class) still use is to simply nudge the object 8 times. It’s simple and straightforward, but it also requires you to press the arrow key 8 times. That in itself takes a couple of seconds.
There is another, much better way to do this. It does require you to be fast with math, but once you try it you’ll feel like the Flash, speeding through your designs and saving the world one nudge at a time.
As you can see above, you can achieve the exact same result by pushing (10p) the object first, and then nudging it twice in the other direction. This is three keystrokes instead of 8 (assuming you count shift + arrow as one).
Of course you can merge all three techniques, including the shove (15p), but it requires a little bit more effort and fast math skills.
Compounding the effect of keystrokes
Even if you save 3–4 seconds each time you perform this action, it’s one of the most common actions that you perform in the design tool. Looking at it from a perspective of a year…
you could be saving hours on just that little trick alone.
If you’re working on an 8-point grid, you can use plugins to modify the default nudge, push and shove values to respect that. For example you can change the default 1/10/15 to 1/8/16 and that will speed up your workflow in a great way too.
DIY Icons
Unless you’re working with an already pre-defined set (or a design-system), this trick can save you a lot of time. In a typical scenario, to add an icon to your project, you need to open an icon-pack, find the icon, copy it and paste it into the right file. Or find an individual SVG icon on your disk, and drag it onto the artboard.
That is a very slow way of adding icons.
Did you know that the most popular icons, like arrows, chevrons and magnifying glass, can be done very quickly inside your design tools? You can also create them way faster than it’ll take you to fetch them from an external library.
I made a short video on these techniques, that should help you especially with the exact “how-to” on the icons. It’s just some simple shapes, so definitely worth practicing.
Efficiency is definitely an area that needs improvement among UI designers. Obviously, a lot of that efficiency comes from practice, but you can implement some of these practices right now — even if you’re a beginner.
Saving those precious seconds will result in more time to learn actually useful things. Let me know if you’re using these, or any other speed designing techniques in your workflows.


